Tuesday, August 31, 2010

Stitch Painter Speed Demon!

Stitch Painter Speed Demon! (Or...Speeding Up Your Work With Keyboard Shortcuts)
by Ginger Luters, Grass Valley, CA

Stitch Painter is such an easy, user-friendly program. Designers can get to work quickly, without a long, frustrating learning curve. But, once you are past the beginning learning stages it is easy to stop right there. You can do what you need to do, and of course, no one wants to read the manual! But if you will take a bit of time to take the next step...to learn some of the keyboard short cuts, you will find that you can work faster and in a more concentrated manner, without the distraction of having to move your cursor to various menus and tools.

When I am working intently on a design, zoomed in to get every detail precisely right, I find it extremely distracting to have to stop what I'm doing and move my cursor over to the tool box in order to erase one or two squares, or up to the top menu, in order to zoom out to see the entire design. Over the past year, as I've worked more and more with Stitch Painter, I've gradually learned to automatically use many of the keyboard shortcuts.

I love how they simplify and speed up the design process. I sit with my left hand near the lower left corner of the keyboard. My little finger is near the Ctrl and Shift keys. From this position, I can use most of the shortcut keys with very little movement of my left hand. My right hand is working with the mouse, while the left hand controls various tools, zooms in and out, undoes errors, etc. I've just finished a design project that required reworking an older design that was done in Stitch Painter. This involved a great deal of cutting, pasting, picking up of brushes, flipping, etc. and the keyboard shortcuts were invaluable here. While I certainly could have accomplished this without the use of keyboard shortcuts, it would have taken much more time, and would have been a more complex, less fluid process.

As you begin to learn the various keys, you'll probably find it useful to keep a "cheat sheet" near your monitor. You can use the Quick Reference Card that came with your Stitch Painter Program, or make your own. Don't try to just sit and memorize the various short cuts. Learn them as you go along, as you need them in your work. This way, you'll learn the ones that are most useful to your first, and you can gradually add others as you go along.

Tool Shortcut Keys

Some of the easiest to learn, and I think most useful, are the various Tool Equivalent keys. By using these keys, you can switch from one tool to another without ever moving your cursor from your design. These keys are simple because you only have to press one key (Ctrl is not needed) and in most cases, the letter that you press is the first letter of the name of the tool. So, let's imagine that you have pressed "p" (for pencil) and you are drawing a design. You decided that you need to erase an entire area. Just press the "e" (eraser), erase whatever you want, then, press the "p" again and go on working. If you erase more than you intended to, you can press Ctrl + Z, to undo your last action.

Once you have drawn a small design, you may wish to pick it up and use it as a brush.. Your left hand is in just the right place to press "s", the Selection tool. Once you have outlined the area you wish to pick up, your left hand is again right where you need it to press Ctrl + B (Capture Brush). If you leave your brush to work with some other tool, it will remain in the program's memory until you create or load another brush. So, if you press "l" (Line Tool) in order to draw a straight line, and then you want your brush back, all you have to do is press "b" with your left hand, and the brush that you picked up is there again.
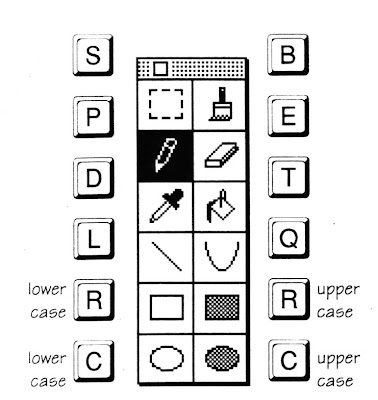


The other tool shortcut keys are equally simple. The Dropper is selected by pressing "d". You can then click on any color in your design to make that the working color, and you will automatically return to the tool you were last using. The Paint Bucket is chosen by pressing "t", one of the few keys that isn't the first letter of the tool's name. Think of the "t" at the end of both words in the name of this tool. painT buckeT. Rectangles are, not surprisingly, selected by pressing "r" and circles by pressing "c". If you want the solid version of these shapes, just capitalize the letter on the keyboard. Finally "q" will give you a Curve tool. I think of the curved line that a written "q" forms.

Flipping, Rotating, and Zooming

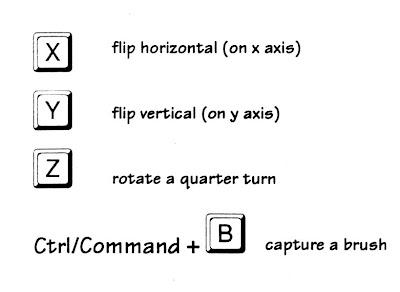
Other single keys that I frequently use are the "x", "y", and "z" keys. These will flip your brush horizontally, vertically, or rotate it. I love to pick up an abstract little brush and then rotate it four times, stamping it down each time without moving the cursor. This creates an entirely new motif...and of course, you could press "s", select this new motif, press Ctrl+B to pick it up, then press "z" four times to rotate the new motif.


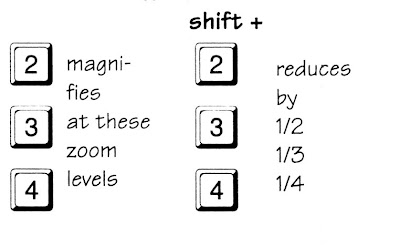
Zooming in and out is also speeded up by the use of the keyboard, Just press the number 1,2,3 etc. to zoom in the desired amount. When you want to zoom out, press Shift along with the desired number. I find that I do this all the time ... zooming in to work on a detail or to stamp down a brush in just the right place, then zooming back out to get the overall effect. Once again, most of these keys are on the left half of your keyboard and can be reached with very little movement of your left hand.


Menu Bar Equivalents

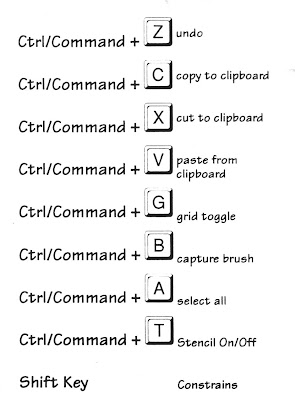
Nearly every item found on the Menu bar across the top of your Stitch Painter screen can be chosen with a keyboard command. We won't go over each one of them here, but lets take a look at some of the most useful shortcuts. The one I probably use the most is Ctrl+Z, the Undo command. If my right hand slips, the design isn't quite right, I just press Ctrl+Z with my left hand and do it over again. I also use Ctrl+G a lot. This toggles the grid on and off the screen. I like to use the grid as I'm designing, then remove it to get a more realistic overall view.

I mentioned Ctrl+B earlier, the Brush Capture shortcut. This is very handy, especially at times when you are focusing on the brush and what you are going to do with it..you don't want to stop and move the cursor up to the Menu bar. I often copy brushes to the Windows Clipboard using Ctrl+C and then paste them back into some other location or document, using Ctrl+V. Ctrl+X will cut (instead of copy) a selected area of your screen. This can be a speedy way to remove part of a design, rather than erasing it bit by bit. You still have the cut section of the design on your clipboard, just in case you want it back. Ctrl+A will select all of your design, ready to be manipulated as you choose. I also find it handy to be able to turn the Stencil on and off using Ctrl+T. Finally, Ctrl+R will select the Draw in Repeat function. While I frequently use this function, I find that I usually need to set the repeat size, so I am forced to move my cursor up to the Layout Menu for this item.


Miscellaneous Keys

There are several other keys that I find myself using more and more. Pressing the spacebar while you are working with any tool will toggle you between that tool and the previous tool. Pressing Shift constrains your drawing to a precise horizontal or vertical axis. The Back-space key will remove any selected area. This can be a quick way to erase large areas (have you ever noticed how many different ways you can erase in Stitch Painter?)

There are many other keyboard shortcuts that we haven't discussed here. You can open new files, open old files, close files, save, print, and quit, using keyboard commands. I find that I use these less frequently, probably because these operations are separate from the actual design process and I don't mind clicking on the top menu bar for these. Probably as I work more with this intriguing program, I will find myself learning and using these additional shortcuts as well. For now, I'm thoroughly enjoying the fun and ease of designing with Stitch Painter.

~Ginger~
On Windows, many keyboard shortcuts use the Ctrl key. The equivalent key on the Macintosh is the Command key. For this article I use the Windows shortcuts, but Mac folk, just realize that you use the Command key instead.

Monday, August 30, 2010

Facing Alternatives


Hi all...

I'm excited to say that I have an article in the current issue of Threads. It is on Facing Alternatives.

It should be on the news stands now.

~Susan~

Sunday, August 29, 2010

Garment Designer Retreat, New Mexico


A few weeks ago, eleven Garment Designer users met up in Santa Fe and Cimarron, New Mexico. We had four great days together, the last three were spent working with Garment Designer. The retreat took place at Casa del Gavilan, a hundred-year-old inn.

Here is our group... both serious and not so serious.

One of the projects embarked on, was the copying of ready-to-wear. Here you can see Rebecca wearing a top everyone fell in love with.

Below, you see the muslin, made after creating the pattern in Garment Designer. A shawl collar was the focal point of the garment.


Maybe we can get some of the retreat girls to upload the final tops they made. Ladies!!

The last night, we had dinner out 'in town', and met a few of the locals.
Maureen..

and Susan...

Wednesday, August 4, 2010

Using Brushes with Stitch Painter

Using Brushes with Stitch Painter by Betty Abbott, Christchurch, New Zealand

**Note: Although this article addresses machine knitting examples, one can learn and adapt the concept to their own craft.

Stitch Painter brushes offer so many opportunities for short cuts in design that it is worthwhile creating 1TOOLS FILE to keep them all handy and in one place. Of course, you can save each brush individually, to be called up when needed, or you can toggle to the 1TOOLS file to select, capture and make a brush when you need it. Why not call your master file simply Tools? Because it takes time to run through all the alphabetically listed files until T appears. Put a 1 in front and it jumps the queue and appears on the opening list... And of course when 1Tools gets to large, 1aTools will be added.

So what brushes are saved to a 1Tools file?
Mine are geared towards knitting pattern design. Using lots of single bed jacquard (fairisle) it is preferable to keep floats to a maximum length of 7 stitches.


So first up is a float check: a horizontal line of 7 stitches in a bright, easily seen colour. Load this and run it over any new fairisle design to check the float length. If it doesn't span the space between any two stitches in the pattern the float will be too long and the pattern needs editing.


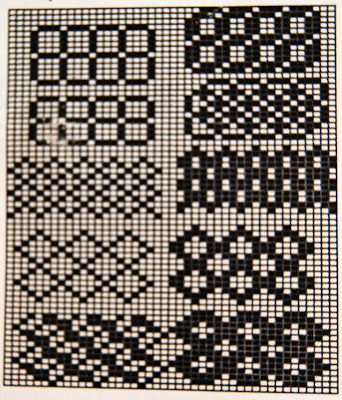
Alternate row alternate needle selection is a frequently used but tedious to draw pattern. Keep a block of it on hand as a saved brush - and use a brush of a single row of alternate dots to create it. When you want a diamond filler, load the brush, stamp and trim it to shape, load the adjusted shape and enjoy the time you've saved.


2 x 2 selection? Load the 1 x 1 brush, BRUSH MENU set size and double the width and height. FILE MENU, save as: 2x2check.


A one stitch one row diagonal? Hold down Control as you draw with the line tool, save as a 1stdiag brush.


Or a one stitch two row diagonal? load the 1stdiag brush. BRUSH MENU set size: double the height and leave the width unaltered, FILE MENU, save as a new brush.


Trellis? - diamond or block - useful in several sizes. Above: Examples above and below show a double stamping of the brush alongside. - a fun way to create new borders or allover patterns.


Above: If you are going to be using several related 'tools' in a pattern, save them all as one brush, load, positioning at one side of the page well out of the way of the developing pattern and recapture each individual tool as it is needed.

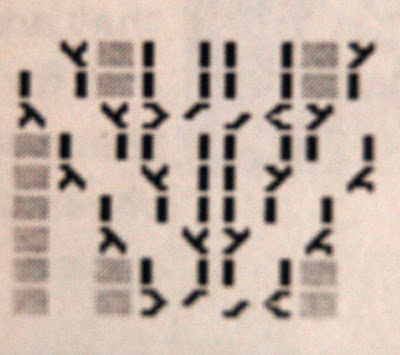
Gridding lace patterns can be very tedious business with lots of scope for errors. But if you analyze the sequences most frequently used, brushes can improve accuracy and speed up the design process at the same time. You may want to open a separate Lace Tools file for quick access to them.

Suggested sequences are:

Multi diagonal transfer sequences separated by 2 rows stocking stitch.

Diagonal single transfers separated by 2 rows stocking stitch.

Vertical single transfers separated by 2 rows stocking stitch.

Brushes about 4 transfers high/wide are a useful size. A large pattern will build up quickly and accurately by overlapping the last stitch with each stamp, with the minimum of erasing when the pattern is small. Neither is there any need to be concerned about direction with diagonal transfers. A horizontal flip (x) will slope it the opposite way.

Perhaps a GCARTOOL file as well? Moss stitch and double moss, basket stitch, ribs, broken ribs, double garter stitch, diamonds made up of one stitch two row diagonals and so on. The same for Tuck and Slip.

Not directly pattern related but nevertheless very useful is a numbers brush. Although there is already a set of numerals in the SYMBOLS palette (WINDOWS MENU, Symbols) for my purposes I found these a little on the small side so created a set of my own which were loaded into the working palette, lined up on the page, and saved as a NUMBERS brush. Now whenever I need to add numbers to a pattern which is to be printed I load the Numbers brush. But to access the numbers I must also go to the PALETTE MENU, and click (tick) 'Use Brush Palette'.

This loads the palette in use when the brush was saved i.e. the palette which contained the set of numerals. Remember that all the other brushes mentioned here relate to stitch pattern composition; this one does not, so DO NOT include numerals in a pattern which is to be downloaded to your knitting machine. Remember also, that numbers are symbols and may require a larger grid size in order to be seen properly. Ideally, a grid size of 8 x 8 or greater is recommended, depending upon your symbol..

Any frequently used sequence can be ready to use or adapt at any time. This holds true for HANDKNITTING AND CROCHET where certain operations, such as cables are repetitive and used in various projects.


Making a brush of various operations is an worthwhile timesaver.

Now for some 'pattern building' shortcuts you may not have used.

Want to draw with a thicker pencil? Create a brush to the pencil shape you want and click and drag to draw. The shape does not need to be squared off - experiment with rounded corners and see the nice curves they draw.

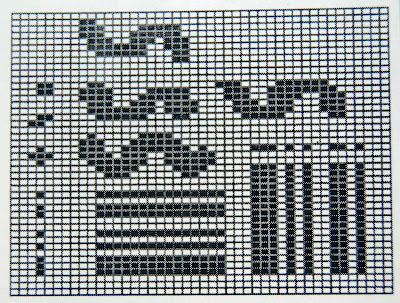
Rows of horizontal lines? in a vertical line draw one stitch for each row required. Select and create brush (s and Ctrl B or Command B). Hold down the Shift Key as you click and drag slowly across the page.

Rows of vertical lines? Draw a horizontal line with one stitch for each row required (or rotate (z) the horizontal line brush, mentioned above). Create brush, Shift Key, click and drag slowly.


The more I use Stitch Painter the more exciting become the possibilities of this wonderful design tool - and I'm sure these ideas have barely scratched the surface of the innovative ways in which Brushes can be used.

~Betty~

Click Here for some Stitch Painter files. Do so will download a zipped folder called betty that has some Stitch Painter files and some Stitch Painter brush files.

Designing Quilts and Quilt Looks with Stitch Painter

Designing Quilts and Quilt Looks with Stitch Painter
By Tracy Ahrens, Cardiff by the Sea, CA

Many of us have grown up with the quilts that have been handed down through generations and quilting today is one of the most popular fiber-art crafts that exists. From the home consumer to the Smithsonian, quilt designs provides an innovative canvas you can use to convey your art.

There are endless options available now for the computer and choices that can be used for exciting new concepts in quilting. Any texture/print or color combination can now be tested and determined on the screen. In addition, you may experiment with block rotation and manipulation quickly and effectively. The end product does not necessarilly have to be a fabric quilt. Rather, you can incorporate a 'quilt-look' into a stitched piece of canvas or a knit garment. The idea is that quilt blocks serve as your inspiration.

Using Stitch Painter you can create your own quilt blocks, or as we did in the following tutorial, you may use pre-drawn blocks from the Traditional Quilts, one of Cochenille's Elements Clip Art collection. In the following lesson we will us Stitch Painter, and two files from Quilt collection; PINWASK2 and NTHMBLS2.


Creative Play 1 - Using different block sizes to create your quilt.
The quilt above was designed with the brushes named PINWASK2 and NTHMBLS2. These are 4-patch brushes in 2 colors. To start your quilt in Stitch Painter you will need to determine the size of the finished piece. In your mind, you will determine the scale of each grid square. For example, you may decide each grid square in Stitch Painter will represent a square inch or half a square inch. We will use 1/4 square in. The size of the grid doesn't really matter, as long as it is square. Therefore, lets set it at 8 pixels wide, and 8 pixels tall (Layout/Grid menu).

Your document size would be equal to the finished size of your piece multiplied by the gauge/count (if knitting or stitching) or the inch scale (if quilting) of the materials you are working with. Lets say your quilt will be 3 ft x 3 ft and we want each square (grid) to be 1/4 inch. Multiply 36 inches X 4 Squares to the inch to get 144. Our document size will thus be 144 units wide, and 144 units tall (File/Set Document Size). As it turns out, our clip art blocks measure 24 units wide and 24 units tall. If each unit on the grid equals 1/4 inch, then our blocks will measure 6 inches square (divide 24 by 4).

After you have set your document size you may then start loading brushes, experimenting with different colors and sizes, and begin stamping the blocks in place. I enlarged NTHMBLS2 to a brush size of 30x30 and began to stamp it in place. When you are loading brushes, you may change the size by using the Set Size selection under the BRUSH menu. I also enlarged PINWASK2 to a 60x60 brush because I wanted the center design larger than the borders.


At this point you could manipulate your quilt brushes as you set them in place, using your keyboard shortcuts; x to flip horizontally, y to flip vertically and z to rotate a quarter turn. You could even capture a particularly interesting area of the quilt as a brush and use that for your border.

One of the best features of Stitch Painter is the ability to change colors and motif sizes in a snap. After bringing in both brushes and stamping them in place, I wanted to change the colors. This time I chose the simple approach, and selected the Fill Bucket and a color from within one of the blocks (using the eye dropper) to fill in the white background spaces of the quilt.

Creative Play #2, Repeat Functions
Another Stitch Painter functions that is wonderful for design and visualization is the ability to create repeat patterns. With the quilt blocks in the Elements Collection there are two sizes to work with; 24x24 for the 4-patch quilts and 36x36 for the 9 patch quilts. Let's build a repeat with a 4 patch block:

1. Set the grid size to 4 pixels wide by 4 pixels tall (Layout/Grid), as this will create a smaller squre grid, and you will see more of the quilt at once on the screen. Again, we will assume that each square represents a 1/4 inch.

2. Load your 24x24 quilt block as a brush (Brush/Load menu). Use either SAILBOAT.SBR or EVESTAR.SBR on the disk.

3. Set your Document Size to 120 units wide by 120 units tall (File/Set Document Size.)

4. Under the Layout menu choose Set Repeat Size. We'll use 48 as the width and height. (a multiple of 24)


5. When you stamp your motif on the screen, it will repeat every other block in the width and height. You may want to stamp the first brush in the upper left corner of the screen in order to ensure that the blocks all fit perfectly on the document.


In the illustration above I loaded SAILBOAT.SBR (9 patch) from the Elements Collection and I used that block repeat. Since this block was a 36x36 unit brush, I chose Brush/Set Size and changed the block size to 24x24. You can also flip and rotate the brush by using x, y or z on your keyboard. After stamping the sailboat block in alternate checkerboard manner, I loaded a second block/brush, EVESTAR.SBR (4 patch) and played with it. If I had wanted to, I could have simply created a solid colored block by using the solid rectangle tool.

I decided to create a positive/negative color effect with the EVESTAR brush. To alternate the colors in the blocks, use the fill bucket. I temporarily changed the dark blue of one block to pink (with Repeat still turned on). Then using the fill bucket you can exchange the light blue with the dark blue then exchange the pink with the light blue. You have now the same blues but reversed in the alternate EVESTAR blocks.

Stitch Painter allows you to exchange colors easily and quickly once the quilt is designed. To do this, open the Color Mixing palette/window (Windows/Color palette on the IBM, or tear it off on the Mac). Then, using your eye dropper, select a color in the quilt you want to change. Once this is the selected color in the Working Palette (on the left), choose the new color you would like to try in the Mixing Palette. The new color will move into the old colors place. You can continue to experiment with various color ways until you create the quilt of your dreams.


Stitch Painter also lets you swap colors for symbols and Textures (Gold version only) at any time. When your design is finished you can also estimate your yardage, yarns or floss usage by clicking the eyedropper tool in the Tool palette and your number of stitches will show up at the lower left corner (coordinate bar). Depending on the scale you have determined, you can then estimate yardage usage by how many units you have of that color. In addition, if you plan to knit or stitch the garment, this process will tell you how many stitches of that color.

~Tracy~

Carlsbad Cochenille Design Retreat

Every year Cochenille Design Studio and Susan Lazear host a Design retreat. This year we will be back at the Carlsbad Inn Beach Resort, wonderful place. They gave us a room rate that is almost half there usual rate.


It will be September 10th to the 12th, 2010, If you have the weekend free and will need to relax after getting the school year started again. Join Us!

Day 1 Field Trip: San Diego Area Friday, Sept. 10th
Meet at 9:30 a.m. This day will involve exploring various studios, galleries and shops to get inspiration, and to pick up goodies (if you desire) to use in your projects. We will visit an assortment of the following: • Wearable Artist Studios• Fabric and Trim stores • Yarn Store(s) • Other related and inspiring venues

We did this 4 years ago and it was great, there were about 15 ladies and we visited so many local artist and great Art places in San Diego, that I didn't even know we had in the area! I look forward to driving around town with a good group of ladies.

Day 2 Accessory Design Susan Lazear Saturday, Sept. 11th
On this day, you will learn some of the basics of designing accessory items. In the a.m., Susan will show you how to draft patterns by hand or by computer (using Garment Designer) for purses, totes, hats, non-traditional scarves etc. She will also teach you the art of draping a contoured belt on a body. After lunch, students will choose one or two accessory items, and create patterns for these to use the following day.

Susan Lazear is a Professor of Fashion at Mesa College in San Diego. She teaches fashion courses in- cluding Patternmaking, Draping, and Textiles. Susan designs wearable art, and is a computer graphic artist. In addition to her teaching she writes books and articles for creative audiences. She combines her skills in the development of a line of software for the textile arts, developed under the Cochenille Design Studio name.

I learned a lot of what I know from her wonderful classes at San Diego Mesa College. You do not need to be an expert and because Susan is teaching Design principles you can apply them to either sewing or knitting. You don't have to own our software everything she does on the computer you will show you how to do it by hand. Plus you don't have to be an expert all projects will be step by step from start to finish!

Day 3 Construct and Embellish Linda Medina Sunday, Sept. 12th
Linda Medina will teach you various methods of constructing and embel- lishing (whether knit or sewn) accessory items. You will be exposed to a variety of techniques, and may choose which ones to incorporate into your project. In addition, you will be encouraged to make samples of multiple techniques so that you can later pull from them to develop further projects.

Linda Medina is an artist and designer. She has made custom and one-of-a-kind clothing and accessories for many years,and teaches needlework, sewing and knitting. Her knitwear designs have been in all of the major knitting magazines and many books. She introduced a line of knit and crochet patterns under “Medina Originals” in 2009 and plans to add cross stitch and nee- dlepoint designs in 2010. Linda’s work is included in the International Friendship Tapestry in Iceland, private collections, and is in the permanent collection of the White House.

These two wonderful ladies are ready and willing to show you how to make some wonderful accessories and how to make them stand out.

If you have any questions or you want to Register or just would like more information. Call me: Sonia 858-259-1698 Mon - Thurs 9:30 to 4 PST.

Past Retreat Post