Thursday, December 30, 2010

Drafting a Baby Onesie in Garment Designer

Having questions to answer makes writing blog post must easier. Do you have a question you want answered? Email it to us at info@cochenille.com

Basics of Drafting a Baby Onesie in Garment Designer


First you will want to make sure you have the correct measurements if you will be working with a knit fabric. The best thing to do other than try and reinvent the wheel is to find a Onesie and measure it off. First measure the Onesie and then measure the child and you will figure out the amount of Negative ease that you will need to build into your Onesie. For a woven fabric, well I don't think I've ever seen a Onesie in a Woven fabric you just might be the first. Please send Pictures if you sew one up!!!

For Sewing:

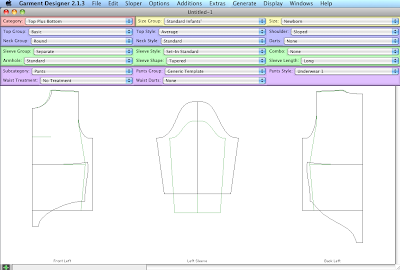
Select from your drop down menu's the following:

Category: Top Plus Bottom
Size Group: (the size you need) Standard Infants' (example)
Size: (the size you need) Newborn (example)
Top Group: Basic
Top Style: Average
...
...
...
Sleeve Shape: Semi-Flared
Sleeve Length: Short
SubCategory: Pants
Pants Group: Generic Template
Pants Style: Underwear 1
...
...


When you start doing Advanced work in Garment Designer it will sometimes generate Error messages. This doesn't mean that you are doing something wrong - as long as you know what it is you are after, you can simply read the error messages and sometimes you need to do as they say, and it will let you move on. Once you are done you can Check the Information and Recommendations page to see if there might be something that would make your design unusable.

I received the following:

Error 51: The Top Plus Bottom Category is intended as a limited use preview category only. You should normally work in the Top or Bottom Category. See Appendix E. - First the Appendix E depending on Which version of Garment Designer you have - will either be as a PDF in a folder called Tutorials Plus in the Garment Designer folder on your Hard Drive - or at the end of the Garment Designer PDF manual. That will give you more information on how best to use the Top Plus Bottom feature.
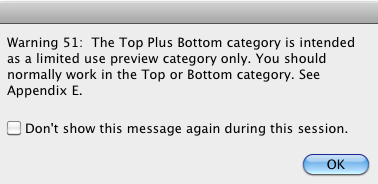


Also as your moving points around you might receive others - Your not hurting the program just click Ok and keep working.
Don't let it detour you.

You then simply move your points around to draft the pattern you want.

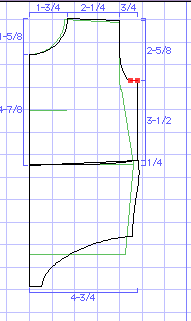
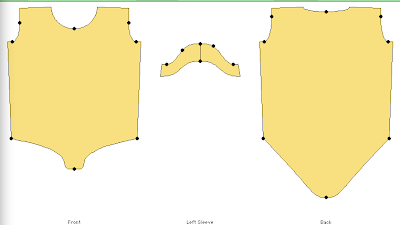
I moved up the bodice hem to line up with the underwear waist, I didn't worry about it being perfect. I'll be cutting out the pattern as one piece so the inside doesn't matter. Then I moved the Bodice Side Hem point in to meet the Underwear side waist.
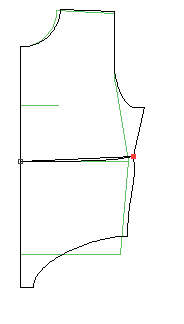


I then Displayed my Deminsions and my Grid - to change my armhole to match the one I had measured off.


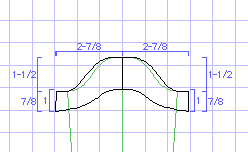
I then worked on the sleeve. The Onesie has a small set in cap sleeve. I Chose the Semi-Flared Sleeve Shape because that style sleeve give me a curved sleeve hem with two Bezier curves I can control. A simple cap Sleeve follows the curves of the cap. Like so:


The last thing I needed to do was extend the back underwear crotch to build in an overlap for the snaps. I simply disabled my Front/Back Symettry and draged my crotch line down 1 1/2 inches (which I had measured off my existing Onesie).

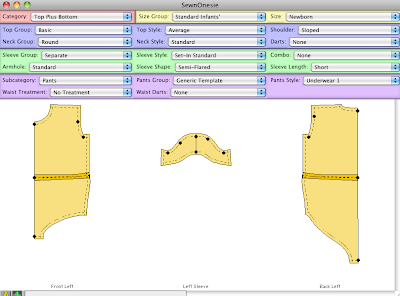
I added 1/4 inch Seam Allowance to use my serger. The pattern pieces are ready to use:


For Knitting: (you will need to be a bit more creative and do a bit more point movement)

Select the same styles as for Sewing.

Select from your drop down menu's the following:

Category: Top Plus Bottom
Size Group: (the size you need) Standard Infants' (example)
Size: (the size you need) Newborn (example)
Top Group: Basic
Top Style: Average
...
...
...
Sleeve Shape: Semi-Flared
Sleeve Length: Short
SubCategory: Pants
Pants Group: Generic Template
Pants Style: Underwear 1
...
...

With one big difference: Select for your Top Style: Tip Center Curve.
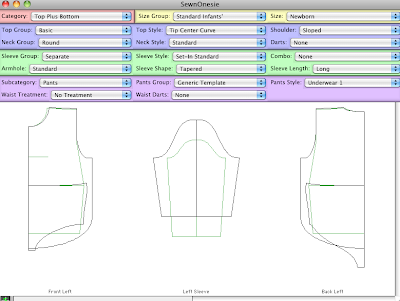


You are going to trace the outer underwear shape with the bodice points, so that you can generate shaping instruction for the whole piece.
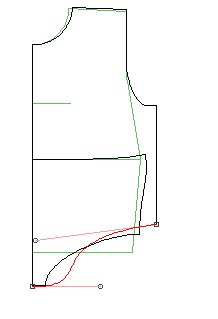


Simply select the hem points and start adjusting your curves until you get a good replica. You will need to do the front first.
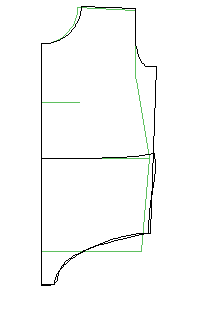


Then turn off your Front/Back Symmetry DON'T turn off your Left/Right Symmetry because you'll want to display both left and right right before you generate shaping instructions.

Do your Crotch Overlap extension and then move your points and copy the shape. The back doesn't come as exact as the front but comes really close. If I wanted a good curve there I would generate a pixel-per-stitch graphic and paste in into Stitch Painter and there touch up the back crotch curves. But that small amount I don't think is going to make a big difference.
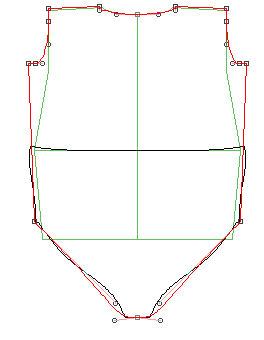


The sleeve and armhole pattern drafting you do the same as the Sewing instructions above.
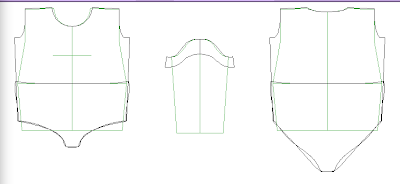


Then Change your Category to Top. Display both the Left and Right side of your Front and Back. Then Generate your Shaping Instructions.


If you have any questions feel free to email us at info@cochenille.com

~Sonia Barton

Note: Some of the Styles used require Style sets 1 and Style set 2.

Monday, December 27, 2010

My Inspiration Files

My Inspiration Files . .

Let’s Get Organized Electronically!
Susan has developed an electronic database that can be used to store images for inspiration. I started this project by pulling out all my folders in the file cabinet that had all my clippings.

Installing the software was really easy to do. The installer makes a My Inspiration Files folder in your program files folder (Win). So the first thing I did in order to start off organized was to make a folder inside the My Inspiration Files folder called Graphics. All my images that I scanned or acquired from the web went into the folder. It made it so easy when I went fo create a back-up CD. If I have learned anything in the last 6 months it’s create a back up, even if you just did one yesterday.


Scanning
I scanned everything I had. I even scanned little pieces of paper I had sketched ideas on. Needless to say I was side tracked more than once, when I found stuff I hadn’t seen in a while. The process totally rejuvinated the artistik flow. It took lots of hours to get everything scanned. Oh the reward when I was done. I could open the program and place each image on an individual card, and scroll up and down, and search and look at years of collecting in a matter of minutes.

I entered as much information as possible in the description box. I tried to make sure that I used key words that came to my mind when I thought of that image, so that when I returned to the program to do a search I could find it easyly. Always make sure to fill in the field that asks for the file name of the image, so that if you didn’t place the image in your graphics folder you have the name in order to do a search and find the image.

Image Mode:


List Mode:


This is a perfect aid to organize images. You can also find images on the web and sort and organize those in the same manner. See newsletter #1 Pg #5 for further instruction on acquiring images from the web.

The program also has a list where you can organize your favorite inspiration web-sites. It comes with a starter list of over 150 sites. It was fun to visit the sites that were listed. I kept a lot, but I knew some I just wouldn’t use in the future so I replaced those with some from my own list of web-sites, there finally of those little pieces of paper. By giving them a rating and typing in key words you can easly find inspiration in the future. This really helps when you loose a computer and you realize you didn't back up your web-browser to keep all you bookmarks.


As with any software make sure you do a back-up of your file and images often. I have chosen to keep my paper files on top of having them on the computer. My compurters seem to be accident prown.

Cheers to Organization.

~Sonia Barton

Tuesday, November 30, 2010

Garment Designer Shortcuts...

Garment Designer Short Cuts...
by Sonia Barton

Garment Designer is so user friendly that you can simply install it and get started. This is a great thing, the only problem is that most of the time the manual doesn't get read and the vastness of the programs abilities can be missed. One thing that will help you get the most of Garment Designer is to learn the short cuts.

I'm a one hand on the keyboard and one hand on the mouse person. It just makes a project go a lot faster.

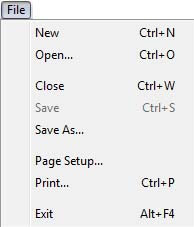
File Menu

Most programs have the same File commands and the same short cuts. The one I use often is Ctrl + S, Save. Save your work often, if you are doing something that you don't think you want to be permanent to that design then do a Save As and create another document. Just in case you have done something you don't want but you don't want to move all those points back or select the points and do an undo All Point Movement On Selected Points.


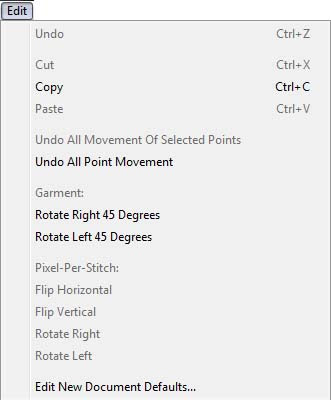
Edit Menu

The edit menu is also some what similar to other programs. The Undo, Cut, Copy and Paste. Garment Designer has a couple more shortcuts for this menu. When you are in the Pixel-Per-Stitch Window you can use the following shortcuts. x/X to Flip Horizontal, y/Y to Flip Vertical, z to Rotate Right and Z to Rotate Left.


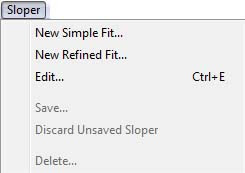
Sloper Menu

There is one listed shortcut in the sloper menu. I must admit I don't have this one memorized. I don't use it often. However, while I'm here I would like to mention how you delete a sloper. This question comes into Techsupport often. When you are viewing a Custom Sloper the Delete (the last command listed in this menu) with no longer be grayed out. You simply choose the sloper you want to delete from the Custom Sloper library and click on Sloper along the top menu bar and click on Delete...


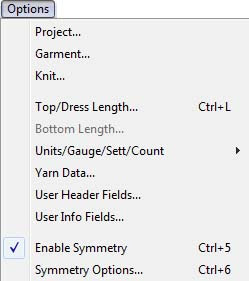
Options Menu

There are more shortcuts to this menu than those that appear in the menu sidebar. Simply press 1 for Project, 2 for Garment, 3 for Knit. The Top/Dress Length is listed as Ctrl + L. Then you can press 4 for Yarn Data, and the Last two are listed as Ctrl + 5 for Enable Symmetry, and my favorite Ctrl + 6 for Symmetry Options.


Additions Menu

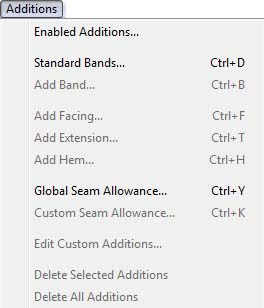
These are so handy when you get to the end of pattern drafting your project and you can then quickly add your Bands for your knitting projects and your Facings, Extensions, Hems and Seam Allowances for your sewing projects. Goes so much faster, especially if you are like me and you use different seam allowances on different parts of the garment. With one hand on the mouse I select my lines and the other hand on the keyboard I hit Ctrl + K on the right side of my keyboard with my thumb and pinky - perfect hand span. There is one shortcut on this menu not listed on the menu side bar, you can press e/E for Edit Custom Additions.


Extras Menu

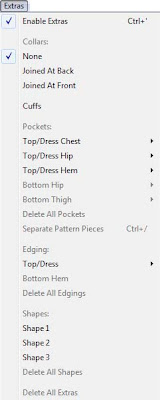
There are two listed shortcuts in the menu. While I'm here I would like to explain a few things. The grayed out menu items that have a colon : are Sub headings to the Extras menu. Collars:, Pockets:, Edging:, and Shapes: will never be ungrayed. In order to use those functions you must select an item from the list below the sub headings. If the menu items are grayed out then it means that something needs to happen first, like for an edging on a hem you need to first select the hem and then the Bottom Hem option will no longer by grayed out.


Generate Menu

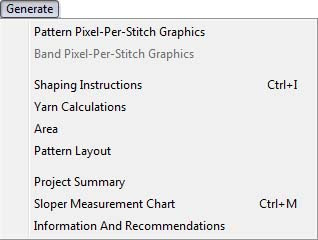
This menu has a bit of shortcuts that are not listed on the menus sidebar. You can hit g/G for Pixel-Per-Stitch Graphics, b/B for Band Pixel-Per-Stitch Graphics, 5 for Shaping Instructions, 6 for Garment Area, 7 for Pattern Layout, n/N for Project Summary, Ctrl + M for Sloper Measurement Chart and m/M for Information and Recommendations.


Display Menu

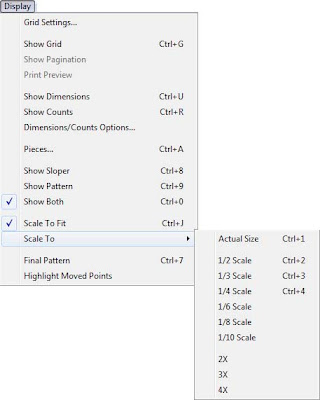
There are four known shortcuts in this menu that are not listed on the menu sidebar. They are p/P for Print Preview, d/D for Dimensions/Counts Options.., Ctrl + 7 for 1/8 Scale and o/O for Highlight Moved Points. There are times when I am working on a project and I have the measurements displayed in decimals and I will select a point and use the arrow keys to move it up or down to try to get an exact measurement and it will skip the number I want it at. You can solve that problem by zooming in and then using your arrow keys to move your point up or down. When you are zoomed in the arrow keys move the points a shorter distance, so you are able to get more accurate point movements.


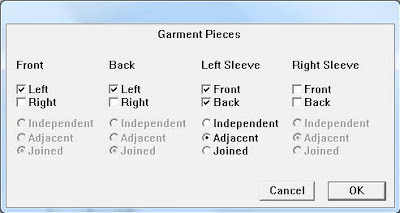
Garment Pieces Display Window

These shortcuts are not listed in the window. To use the following you need to click inside the piece you want it to effect. i/I for independent, a/A for Adjacent and j/J for Joined. This menu also has the following shortcuts that you can use: f/F for Show front of piece, k/K for show back of piece, l/L for show left of piece, r/R for show right of piece, c/C to Show corresponding on body or sleeve and h/H for hide.


Other Shortcuts

There are a few other listed Shortcuts, as I mentioned before you can use the 4 arrows to move your points, I use these a lot especially on a laptop without a mouse. Then there is the one I use most s/S it toggles Symmetry on and off. 0 is for Detailed Dimensions/Counts, and you can use your spacebar to move your screen around. You press the spacebar and Click + Hold + Drag your mouse to move your image on the screen.

****Note: Mac users would use the Command key on the keyboard instead of the Control key for windows.

Also there is a PDF that you are able to print out in either Mac or Windows in the Help Sheets folder that is in your Garment Designer folder on your Hard Drive. Printing them out will help you have them handy for easy access. I hope this helps in speeding up your Design process while on the computer and gets you to your knitting or sewing faster.

~Sonia Barton

Sunday, November 21, 2010

Garment Designer Workshop in Toronto

Meet Heather, Beatrice, Sonja, Sandy, Judith, Jackie, and Kelly.

This past Friday, I spent the day with a group of Canadians (and one American) at a Garment Designer workshop. We had a great time. It is always fun for me to see what people are interested in learning re: Garment Designer.

Thursday, November 18, 2010

November News Email

It's that time of year, the Holiday season is upon us. We hope everyone is
well underway with there projects, if there is anything we can help you
with, Please feel free to call or email. We're here to facilitate your
Sewing, Knitting and Textile arts projects.

New:
Susan has finished a couple more video's you can view them on our website:
http://www.cochenille.com/garm_videos.html Come see! She's working on more
so if you would like to comment or suggest one feel free to email
info@cochenille.com

Cochenille on the Web:

Blog: http://cochenilledesignstudio.blogspot.com/
This month we have a few more 'what we've done post' and a Product Review of
'Grammar of Ornament DVD's". If you have Tips/Techniques or would like to
write an article or product review for our blog feel free to email us with
your thoughts - info@cochenille.com

Facebook:
http://www.facebook.com/pages/Encinitas-CA/Cochenille-Design-Software/241040118585?ref=ts
A big Thank you to all who came over and participated on our Fan Page. Feel
free to come over and write a review, post some pictures, or started a
Discussion (or you can introduce yourself on the Discussion already
started).


Where We'll Be:
http://www.cochenille.com/events.html

Nov 19, 2010 - Garment Designer Workshop Richmond Hill, Canada Area (3
spaces left)

November/December Specials:
http://www.cochenille.com/spec.html

Cochenille Holiday Specials
It's BUNDLE time!


Happy Thanksgiving, Happy Holidays, Hanukkah, Christmas & Kwanzaa. For the
holidays, we are featuring several 'bundles' which should tempt you for all
that holiday gift giving.

What if you already have 'part' of a bundle? We will discount 10% on the
remaining items. Please supply your software serial number. We can ship
ground or air express if you need fast service (for an additional charge, of
course). The last day for Christmas Day Delivery will be Wednesday, Dec.
22nd (with expediated shipping charges).

Garment Designer Bundle 1
Garment Designer 2.5, Style Sets 1 & 2, and your choice of either Easy 7
Jackets Book or Garment Designer Lesson Book.
SP-001 $230.00 Regular: $273.00

Garment Designer Bundle 2
Garment Designer 2.5 and your choice of Style Sets 1 OR 2
SP-002 $195.00 Regular: $224.00

Stitcher's Bundle
Stitch Painter Gold With Full Color Import module, Stitchery Module and SP
Lessons Book
SP-004 $225.00 Regular $263.00

Beader's Bundle
Stitch Painter Gold With Full Color Import module, Beading Module and SP
Lesson Book.
SP-005 $230.00 Regular $268.00

Knitter's Super Bundle
Garment Designer 2.5 with both Style sets 1 & 2, And Stitch Painter Gold
with Full color Import Module
SP-006 $395.00 Regular $463.00


Thank you all for you support:

Susan Lazear
http://susanlazear.blogspot.com

Sonia Barton
http://modistamodesta.blogspot.com

Business Blog:
http://cochenilledesignstudio.blogspot.com/

Thursday, November 4, 2010

Garment Designer at Tennessee Tech University

There are quite a few Universities that have incorporated Garment Designer in there Fashion Design or Home Ec programs.

One of those Universities is Tennessee Tech University. Tennessee Tech University has two programs Merchandising and Design and Human Ecology.

In response to a call for Customer work submissions Sue Bailey, Ph.D., CFCS submitted the following:

Hi Sonia,

Based your call for customers to send blog material, I am attaching four photos of the students who designed vests and dresses in the spring'10 pattern making class at Tennessee Technological University, Cookeville, TN. Garment Designer was used to design each project. I have secured permission from each student to have their photo and work posted if you should choose to use them.
As the class instructor, I simply love the ease of using Garment Designer in the apparel design classes. And, the new videos on You Tube will be extremely helpful. Thanks.

Sincerely,

Sue Bailey, Ph.D., CFCS
Director
School of Human Ecology
Tennessee Tech University


What wonderful Student work! Thank you so much Sue for your kind words and submission.

~Sonia

Wednesday, October 27, 2010

Product Review: Grammar of Ornament

Grammar of Ornament CD Rom Collection of Clip Art for Mac and PC
by Susan Lazear, Encinitas, CA

Many of you may be familiar with a large coffee table book called The Grammar of Ornament by Owen Jones.


First published in 1856, the Grammar was the first text book on ornamental design and design theory. It is a marvelous collection of designs that cover a vast range of cultures and history, from the Egyptians through modern time. The original Folio edition has over 2,300 designs on 100 color plates. It was printed using Chromolithography.

Direct Imagination (Pasadena, CA) has taken the book and reproduced it on CD ROM for use with computer graphics. They has used Adobe's Acrobat software to create a 'click and choose' format for the user, and Adobe's Acrobat Reader is included free on the CD ROM. There are two versions of the CD ROM collection: a Compact version $99.00 and a Professional version $199.00. In both versions, you have access to 2100 copyright free images and you can use a 'click and choose' approach to locate, view and read about the images. You may print an mage, move it to Photoshop (by simply clicking on a Photoshop button) or copy the image to the clipboard and transport it to the graphics application of your choice. The Professional version includes additional files (160) which are in vector format for Illustrator or Freehand. These will give professionals output that is non-jaggy. In addition, the Professional version includes greyscale, black/white and line art version of all the vector files.

What you get:

The program comes packaged in a beautiful box which will aid you in keeping things together. This box was created to simulate the original packaging of the plates. You receive two manuals; one explains the 'how to's' and the second manual is pictorial synopsis of the various plates or images found on the CD Rom. The CD Rom is multi-platfrom (as are the manuals) and can be used on either a Macintosh or a Windows computer.

To Begin:

The first thing you will need to do in order to use the Grammar of Ornament effectively, is to ensure that you have Acrobat Reader installed. Since this is included on the CD, this process is simple. Once installation is complete, take a quick tour, by clicking on the Demo icon. Finally, you may delve into the images. Walk through the tutorial, as laid out in the manual. This will teach you how to use Acrobat to view the various images.

Experiment and Enjoy:

Direct Imagination had done a wonderful job in organizing the images and creating a easy to use environment via Acrobat, so that all you need to do as the user, is click on the appropriate image to be taken to a new chapter/image/text description, etc. A pictorial index exists in the form of icons or button, and these act as 'links'. When you click on an image icon, it links you to the next image. If you click on the notepaper icon, you link to a text description. It is really wonderful! As you explore the collection, you will see that Direct Imagination has also included 'clickable button' that show you movies of morphed designs, end-use application of ornament artwork, etc.

So, how would you use this wonderful source of clip art images?

There are numerous ways you, the craft person or textile artist can work with the images. You could print them onto Heat Transfer printer paper and ultimately decorate your clothing. Or, you could take the images into a paint or image processing program, reduce the number of colors, and import the graphic into Stitch Painter. With Stitch Painter's Full Color Import Module you can take images directly from this Ornament clip art collection into Stitch Painter, which will color reduce and graph the images for you. That is when things will get wild and wonderful. Another use for this clip art, is 'ornamentation' of anything you do on your computer. Imagine creating your own letterhead or business cards, using the artwork from historical eras. Or, create party invitations and banners yourself. Your only limitation is your imagination.


This collection is a must for any designer who wants copyright free, historical ornament at there fingertips! Not all craftspeople would need the Professional version, but if one does desktop publishing in any form, this would be recommended.

~Susan Lazear

Tuesday, October 26, 2010

Blast from the Past

Hi all you machine knitters from the past. This past weekend I was at Newton's Fall Seminar. I ran into a long-time-ago friend.
Can you guess which machine knitter instructor and author is here with me? Yes, we were having fun with Photo Booth on the Mac.... creating Andy Warhol type images.

Susan

Monday, October 25, 2010

Workshop in Denver

A couple of weekends ago, we had a Garment Designer workshop in the Denver area. It was a great day. Computers were lined up around the table and adjacent areas, and lots of laughter and learning occurred.

Thanks to college room-mate Edie, for hosting the workshop.


Monday, October 4, 2010

Cochenille News Monthly Email

A few words about signing up for our email list.

If you have signed up on our email list on the website and are not receiving it, you might want to check your spam filters, or you can try adding info@cochenille.com to your address book.

If you have signed up by writing your email address on a list at our booth at any of the trade shows we attend, and are not getting our emails - you might want to check the above first, if you still don't receive anything go to our home page www.cochenille.com and subscribe on our website. I might not have been able to read your handwriting.

We will start adding the monthly communication here, just in case you still can't get it, check back often.

Here is Octobers:

Hi Everyone,

October is here, and the weather is reflecting it. We hope you are all safe.


New:
Susan has been busy making short video's about Garment Designer, She has
finished a fair amount and posted them on our website:
http://www.cochenille.com/garm_videos.html Come see! She's working on more
so if you would like to comment or suggest one feel free to email
info@cochenille.com

Cochenille on the Web:

Blog: http://cochenilledesignstudio.blogspot.com/
This months Tips/Techniques blog post is "Beading..Peyote Stitch Basics" a
Compendium article by Eleanor Romanowicz (Egor) from Phoenix, AZ. If you
have Tips/Techniques or would like to write an article or product review for
our blog feel free to email us with your thoughts - info@cochenille.com

Facebook:
http://www.facebook.com/pages/Encinitas-CA/Cochenille-Design-Software/241040118585?ref=ts
We so wanted to give away a Free Europe Summer/Fall 2008 Fashion
Inspirations DVD, but no one came over and wrote a review, posted some
pictures, or started a Discussion (or you can introduce yourself on the
Discussion already started). Well we'll give you another chance the first to
do any of the above will get the DVD and maybe depending on how many we get,
we might give away two!
http://www.cochenille.com/producthtml/prodcsw.html#fall2008


Where We'll Be:
http://www.cochenille.com/events.html

October 9, 2010 - Highlands Ranch, CO - Garment Designer Workshop (1 space left!)
October 28 - 31 - Hartford, CT - Stitches East

October Specials:
http://www.cochenille.com/spec.html

Here's your Holloween Treat from Cochenille to you. Place an order of $75 or
more and recieve one of the following items free:

Stitch Painter lesson book CD
Get the most out of Stitch Painter and learn basic design skills as you
go...Motif Creation, Motif development, Basic Repeats, Coloration & Design
Inpiration.
Promocode: FreeSPLBCD Regular: $14.00

Stitch Painter Training Video
GIn this 90 minute plus video, you will be given a guided tour through
Stitch Painter's. . .Toolbox, Color, Symbol and Texture Palettes and Menu
Structures and Commands. To solidify your learning Process, Susan will
demonstrate the creation of two projects: a stitchery oriented project and a
knitting oriented project.
Promocode: FreeSPVD (for VHS)or Free SPDVD (for DVD) Regular: $29.95

Garment Designer's Easy Seven Jackets
Learn how to think 'outside of the box' and use our software to the fullest!
Book includes: 7 jacket styles with instructions on how to make them in
Garment Designer software, Illustrated Sewing Instructions, Knitting Tips
and General Techniques and Tips.
Promocode: FreeEasy7 Regular: 24.00


Thank you all for you support:

Susan Lazear
http://susanlazear.blogspot.com

Sonia Barton
http://modistamodesta.blogspot.com

Business Blog:
http://cochenilledesignstudio.blogspot.com/

Monday, September 27, 2010

Beading..Peyote Stitch Basics

Beading.. Peyote Stitch Basics
by Eleanor Romanowicz (Egor),
Phoenix, AZ


Peyote stitch is the best known of the off-loom beading techniques. In Native American tradition it was used to make religious and ceremonial items associated with peyote rituals.

It is a versatile stitch that can produce a variety of forms. As flat peyote stitch it can be used for bracelets, belts, straps, headbands, earrings, and sewn to form pouches or bags. Tubular peyote is used to form ropes that an stand alone as necklaces or hat bands. Tubular can also be used to cover objects, such as bottles, feather quills, crystal points and even embellish larger beads. When tubular peyote stitch is done on a larger number of beads, it can form amulets, pouches or even larger bags. All of these forms can be created using either an odd or even number of beads. Peyote stitch can also be used for creating textures or embellishments by utilizing techniques such as two-drop, flower clusters, ruffles, curls and spirals, in which each row worked contains only half of the total number of beads in the width of the piece and the following row fills in the spaces formed by the previous row. The grid one designs on for peyote, is thus a 'brick' type grid. It reflects the shifted position of the alternate rows.


Because of the interlocking stepped grid/stitch, using beads of consistent size is critical for the look of the finished project. It also explains why Japanese Delica and Antique beads have become so popular. These beads tend to be consistent in size and since they are tubes rather than round beads, the holes are more consistent and larger which facilitates the necessity to pass the thread and needle through each bead numerous times.

As with many woven crafts, the tension of the thread is critical to the texture of the piece. This is especially true for the first four rows of peyote stitch, since you are establishing the steps of the stitch and the beginning of your design. The foundation row of flat peyote starts as a simple strand of beads equal to the total width of the item with a stop bead at the far end to prevent the beads from sliding off the end of the thread.

This stop bead is usually a larger size or at least a distinctly different color so that it is not worked into the piece by error. The end of the thread is tied around this bead to keep it in place. This bead is removed and the thread end is secured and tucked in after the first rows are completed.

**The illustration below shows you an alternate colored setup row of beading. No stop bead is shown.


The next row of beads is now added by placing one bead between every other bead of the foundation row. When you place a bead between every other bead of the foundation row, you will be displacing the bead that was strung in that position downward. The result of this displacement is that when you get to the end of this row or round, your piece will look as if you have 3 rows in place. If this seems confusing, take some beads and string a foundation row on yarn or thread. (Sometimes a first try or two is best done with larger beads and threads that are easier to handle and hold on to). Now add the second row with beads of a different color than those chosen for the foundation row and watch that your foundation row becomes 2 separate rows of the same color as the new beads displace them.

**The illustration below shows you a second row of 'alternating' colors being added which is a second approach you can take to working with color.


Now, designing in peyote. It is practically impossible to design peyote on a normal straight grid, thus designers always look for special peyote graph paper. With Stitch Painter Gold and the Plug-in Bead Module, one simply chooses a peyote grid, sets up the proportion of the grid (according to the bread proportion), and begins. A second thing to consider when designing a peyote project is whether you are working with and odd or even number of beads. As far as turning the work at the end of flat peyote rows, it is always simpler to use an even number of beads since you will always come out o the last bead at the end of each row. Then all you have to do for the nest row is puck up on bead and go through the nest bead sitting up from the previous row. Sounds simple enough.

The problem is, if you want to do a symmetrical pattern that has to be centered, it can't be done. Why? Because you are working on an even number of beads in each direction, so that you will always have an extra bead at one side. The problem with working with an odd number of beads is that at the end of every other row you will add on the last bead and have no where to secure it in order to get to the next row.

This turn can be accomplished in a variety of ways, depending on your teacher, but I would describe two of the most popular methods that I have come across over the years. One is to run your needle under the loop formed by the threads at the end of the last tow rows and then go back through the last bead of the row you just finished and continue on as if this was and even row.

The second method is to place that last bead at the end of the row and run your thread down into the end bead of the previous row. Then weave your thread in a figure 8 pattern through the beads of two previous rows so that you re-emerhe from the last bead of the previous row and then go back through the bead that needs to be secured. Continue the row as above. I know that this is a lot of words and sounds confusing, but try doing it with those practice beads and yarn and it should become clearer.

One last note about designing flat peyote stitch with an odd number of beads: Since this number cannot be divided evenly, remember that on one row you will be working on an odd number of beads, but on the next the bead count will be even. Therefore, in order for that symmetrical pattern to be centered, the center bead must be placed on a row that contains an odd number of beads.

Before you start any major project you may want to make some practice samples and keep them so you have a reference when you are planning the layout of your next project. Also when you're doing the exercises to see how the first tow rows become three, or are checking out how to turn a corner or end a row. remember that you may see things more clearly if you change your bead color from row to row.

I hope that this will serve as a basic introduction to peyote stitch and maybe answer some questions so that you might feel more confident in using those unusual grids.

HAPPY BEADING!!!

~Egor~


Vicki Star of Beady Eyed Women Enterprises (one of our beta testers) designed this 'bat' Amulet Pouch using Stitch Painter. The Stitch Painter graph is to the right of the finished Amulet Pouch.

Tip:When you have more than one application open on a Mac you can move between open application by pressing the Command Key and pressing the tab key while the Command key remains depressed. You will see a rectangular box appear on your screen with the name of the open programs running in the background. Each time you press the tab key, you will swap into the next program.

Blog Special: Beader's Bundle $225.00 Sale 263.00 Regular price. The bundle includes Stitch Painter Gold, The Full color Import Module (which allows you to scan in color graphics and reduce there color and place them on the grid) The Bead Module (which gives you the ability to shift the grid for Peyote and Commanche Stitch) and a Stitch Painter Lesson Book (PDF, which helps you learn the basics of Stitch Painter very quickly). To order please call 858-259-1698 Mon - Thurs 9:30 to 4:00 PST.

Our Website: www.cochenille.com
Our email: info@cochenille.com

Tuesday, September 21, 2010

San Marcos Design Retreat

We had a wonderful group of ladies join us for our Cochenille Design Retreat.

On Thursday Susan and I tag teamed it and taught a quick Garment Designer from beginning to end type work shop, Showing where all the menu's where what you used them for and then took some measurements. We work through the step by step on how to create a pattern for sewing or knitting and how to print, cut paste and tile the pages for sewing and how to read the Shaping instructions for knitting.

On Friday Susan put together a Day of Exploration in San Diego.

We started with Spirit of the Cloth - They have wonderful fabrics, Vintage fabric, Kimonos, Vintage Fabric, Cambodian, Japanese and Thai Silk. I loved the way she cut a piece of fabric, she finds a thread, pulls and follows it across the fabric and then cuts at her line. This insures the fabric is square and you don't have to loose fabric as you try to straighten yourself. It takes time, but definitely a lost art.


Then visited:

Lost City Beads

Shepherdess

The retreat participants picked up yarn and beads and lots of cool stuff to use for there accessories!

Those were all in the general area of Old Town San Diego.

We then traveled over to Carol Gardyne Boutique a wonderful shop in the Little Italy area of San Diego. She creates some wonderful Hand Painted Silk Scarves.


We then changed gears and visited the Quilt Visions Gallery and the Mingei International Museam.


Both had wonderful eye candy - color, history, fabric and inspiration.

Saturday Susan taught how to pattern draft by hand and with Garment Designer - Hats, Belts and bags.

The paticipants worked hard, had there hands full of projects and idea's.

Sunday Linda Medina showed us the many ways to embellish our Hats, Belts and Bags.


Here are a few of the decoupage books that the participants made for themselves to make notes about all the different things they learned at the retreat.


We had a wonderful time hosting such wonderful ladies, Thank you all for coming. We look forward to next years retreats, keep an eye on our events page for dates and locations, or email me info@cochenille.com to sign up for our monthly email news.

~Sonia Barton~