Showing posts with label Garment Designer Tips/Techniques. Show all posts

Monday, May 27, 2013

Wednesday, August 31, 2011

Zip Top Handbag in Garment Designer

Garment Designer Project submitted by Gabrielle Stanley. If you would like to submit a Guest Blog Post that uses Cochenille products feel free to email Sonia at info@cochenille.com

 Zip Top Handbag

This handbag is a good size for everyday use, providing you don't carry the kitchen sink.


You need: (all measurements in inches. Seam allowances must be added.)

Sides:
Cut 2 inf fabric, 2 in lining and 2 in fusible wadding. Mark Center points at bottom and top.

Base:
Cut 1 in fabric, 1 in lining, 1 in fusible wadding and 1(with now seam allowances) in plastic canvas (or other rigid stiffening). Mark center points of each side and also corners where seam lines intersect.

Top:
Cut 2 in fabric and 2 in fusible wadding.

Strap:
Cut 2 in fabric.

Additionally you will need 2 small scraps of fabric, and a zip. I used continuous zip and cut it 11 inches. The finished opening is 10.25 inches.

To Make:

1.     Fuse the fusible wadding to the sides, base and tops.

2.    Take the straps and fold them in 1/4 along the length, so the raw edges are enclosed. Topstitch down both edges.

3.    Sew the two sides together along the sloped seams.

4.    Position the handles so there is one per side, 3 inches in from the ends, and tack in place. Make sure they are not twisted.

5.    Sew the two small scraps of fabric to the ends of the zip.


6.    Sew the tops to either side of the zip, continuing the stitching onto the scraps of fabric, but leaving the ends unsewn for 1 in. Fold the tops down and topstitch where you have sewn. You will now have a rectangle of fabric with a zip in the middle.

7.    Fold this in half along the length of the zip, and sew the two ends together. Now fold the ends back along the zip, and sew across the triangle formed. Open the zip.

8.    Place the top inside the sides and sew together around the top. Turn right sides out and topstitch around the edge.


9. Take the base and align the middle of the short ends with the seamline of the sides. Pin the rest of the short edges to the bottom of the sides. Sew between the corner markings ONLY.

10.    Clip the sides to the ends of the stitching.

11.    Sew the remaining long edges of the base to the bottom of the sides.

12.    Trim a little from the edges of the plastic canvas and place it inside the bag.


13.    If you want an inside pocket, sew it to one of the lining sides.

14.    Sew the lining sides together along the sloped edges.

15.    Sew the lining base to the lining sides using the same method as sewing the fabric base to the fabric sides.

16.    Place the lining inside the bag and hand sew it around the edge of the zip tape.

If you would like the Garment Designer 2.5 files for this pattern, feel free to email sonia at info@cochenille.com and put Zip Top Handbag in the subject, and a .gds file will be emailed back to you.

~ Gabrielle Stanley
Cochenille Design Studio
UK Educator
http://gabriellestanley.blogspot.com/

Tuesday, August 30, 2011

Using Collars in Garment Designer

There are a few things to keep in mind when using the collars in Garment Designer.

The first thing is where to find them. Most are under the Extra's menu located along the Top menu bar:


There are a few collars that get added to drop down menu's when you buy Style sets, like the Shawl and Tailored collar from the Style set 2 get added to the Neck Group.


Second to bring up a collar from the Extra's menu you must click on either Joined at Front or Joined at Back. Note that the word "Collars:" will always be ghosted it has a colon behind it to denote a Title. There are other Title menu's like this in Garment Designer, it means the functions are beneath the Title.


Third the Collars are separated into Stand, Full Roll, Partial Roll, Flat and Hood. You will need to know the construction of the collar pattern pieces to find the correct collar you are looking for. Susan has done a great job in the manual of explaining the terminology of the collar. Chapter 8 page 25. If you need additional help you can also purchase our Fun Fashion collars PDF booklet. It has more detailed and in-depth information regarding collar construction.


With those key points you are well on your way to be able to add a collar to any design. Please feel free to call or email if you have any questions.

~Sonia Barton
Cochenille Design Studio
858-259-1698
info@cochenille.com


Thursday, December 30, 2010

Drafting a Baby Onesie in Garment Designer

Having questions to answer makes writing blog post must easier. Do you have a question you want answered? Email it to us at info@cochenille.com

Basics of Drafting a Baby Onesie in Garment Designer


First you will want to make sure you have the correct measurements if you will be working with a knit fabric. The best thing to do other than try and reinvent the wheel is to find a Onesie and measure it off. First measure the Onesie and then measure the child and you will figure out the amount of Negative ease that you will need to build into your Onesie. For a woven fabric, well I don't think I've ever seen a Onesie in a Woven fabric you just might be the first. Please send Pictures if you sew one up!!!

For Sewing:

Select from your drop down menu's the following:

Category: Top Plus Bottom
Size Group: (the size you need) Standard Infants' (example)
Size: (the size you need) Newborn (example)
Top Group: Basic
Top Style: Average
...
...
...
Sleeve Shape: Semi-Flared
Sleeve Length: Short
SubCategory: Pants
Pants Group: Generic Template
Pants Style: Underwear 1
...
...
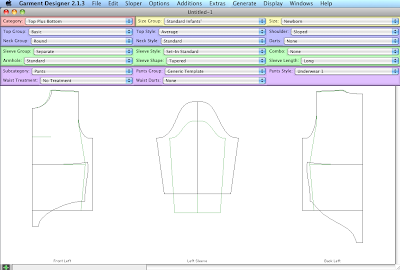


When you start doing Advanced work in Garment Designer it will sometimes generate Error messages. This doesn't mean that you are doing something wrong - as long as you know what it is you are after, you can simply read the error messages and sometimes you need to do as they say, and it will let you move on. Once you are done you can Check the Information and Recommendations page to see if there might be something that would make your design unusable.

I received the following:

Error 51: The Top Plus Bottom Category is intended as a limited use preview category only. You should normally work in the Top or Bottom Category. See Appendix E. - First the Appendix E depending on Which version of Garment Designer you have - will either be as a PDF in a folder called Tutorials Plus in the Garment Designer folder on your Hard Drive - or at the end of the Garment Designer PDF manual. That will give you more information on how best to use the Top Plus Bottom feature.
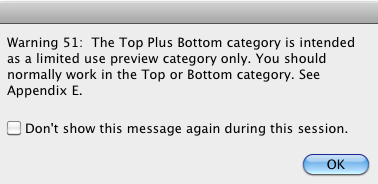


Also as your moving points around you might receive others - Your not hurting the program just click Ok and keep working.
Don't let it detour you.

You then simply move your points around to draft the pattern you want.

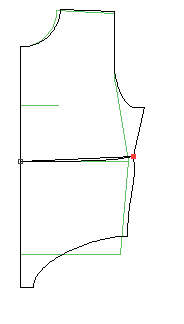
I moved up the bodice hem to line up with the underwear waist, I didn't worry about it being perfect. I'll be cutting out the pattern as one piece so the inside doesn't matter. Then I moved the Bodice Side Hem point in to meet the Underwear side waist.


I then Displayed my Deminsions and my Grid - to change my armhole to match the one I had measured off.
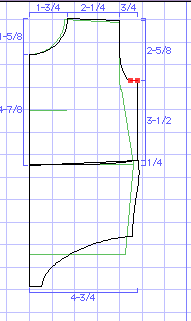


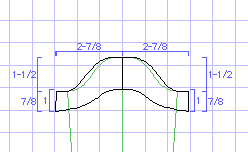
I then worked on the sleeve. The Onesie has a small set in cap sleeve. I Chose the Semi-Flared Sleeve Shape because that style sleeve give me a curved sleeve hem with two Bezier curves I can control. A simple cap Sleeve follows the curves of the cap. Like so:


The last thing I needed to do was extend the back underwear crotch to build in an overlap for the snaps. I simply disabled my Front/Back Symettry and draged my crotch line down 1 1/2 inches (which I had measured off my existing Onesie).

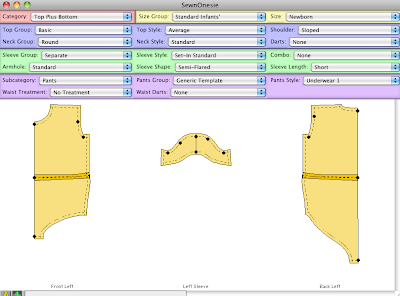
I added 1/4 inch Seam Allowance to use my serger. The pattern pieces are ready to use:


For Knitting: (you will need to be a bit more creative and do a bit more point movement)

Select the same styles as for Sewing.

Select from your drop down menu's the following:

Category: Top Plus Bottom
Size Group: (the size you need) Standard Infants' (example)
Size: (the size you need) Newborn (example)
Top Group: Basic
Top Style: Average
...
...
...
Sleeve Shape: Semi-Flared
Sleeve Length: Short
SubCategory: Pants
Pants Group: Generic Template
Pants Style: Underwear 1
...
...

With one big difference: Select for your Top Style: Tip Center Curve.
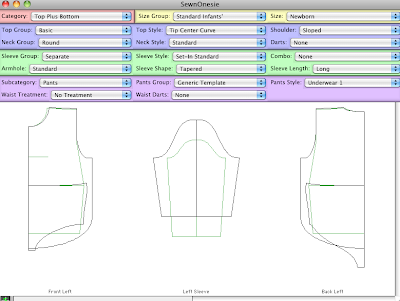


You are going to trace the outer underwear shape with the bodice points, so that you can generate shaping instruction for the whole piece.
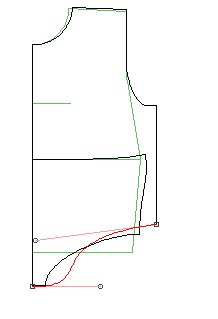


Simply select the hem points and start adjusting your curves until you get a good replica. You will need to do the front first.
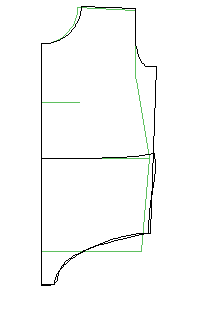


Then turn off your Front/Back Symmetry DON'T turn off your Left/Right Symmetry because you'll want to display both left and right right before you generate shaping instructions.

Do your Crotch Overlap extension and then move your points and copy the shape. The back doesn't come as exact as the front but comes really close. If I wanted a good curve there I would generate a pixel-per-stitch graphic and paste in into Stitch Painter and there touch up the back crotch curves. But that small amount I don't think is going to make a big difference.
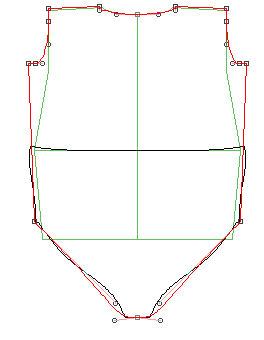


The sleeve and armhole pattern drafting you do the same as the Sewing instructions above.
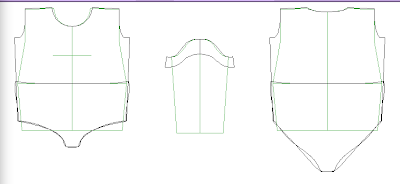


Then Change your Category to Top. Display both the Left and Right side of your Front and Back. Then Generate your Shaping Instructions.
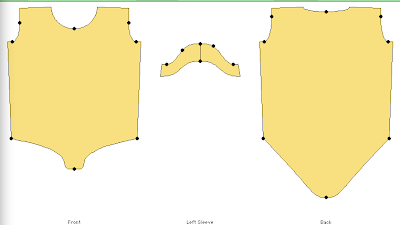


If you have any questions feel free to email us at info@cochenille.com

~Sonia Barton

Note: Some of the Styles used require Style sets 1 and Style set 2.

Tuesday, November 30, 2010

Garment Designer Shortcuts...

Garment Designer Short Cuts...
by Sonia Barton

Garment Designer is so user friendly that you can simply install it and get started. This is a great thing, the only problem is that most of the time the manual doesn't get read and the vastness of the programs abilities can be missed. One thing that will help you get the most of Garment Designer is to learn the short cuts.

I'm a one hand on the keyboard and one hand on the mouse person. It just makes a project go a lot faster.

File Menu

Most programs have the same File commands and the same short cuts. The one I use often is Ctrl + S, Save. Save your work often, if you are doing something that you don't think you want to be permanent to that design then do a Save As and create another document. Just in case you have done something you don't want but you don't want to move all those points back or select the points and do an undo All Point Movement On Selected Points.


Edit Menu

The edit menu is also some what similar to other programs. The Undo, Cut, Copy and Paste. Garment Designer has a couple more shortcuts for this menu. When you are in the Pixel-Per-Stitch Window you can use the following shortcuts. x/X to Flip Horizontal, y/Y to Flip Vertical, z to Rotate Right and Z to Rotate Left.


Sloper Menu

There is one listed shortcut in the sloper menu. I must admit I don't have this one memorized. I don't use it often. However, while I'm here I would like to mention how you delete a sloper. This question comes into Techsupport often. When you are viewing a Custom Sloper the Delete (the last command listed in this menu) with no longer be grayed out. You simply choose the sloper you want to delete from the Custom Sloper library and click on Sloper along the top menu bar and click on Delete...


Options Menu

There are more shortcuts to this menu than those that appear in the menu sidebar. Simply press 1 for Project, 2 for Garment, 3 for Knit. The Top/Dress Length is listed as Ctrl + L. Then you can press 4 for Yarn Data, and the Last two are listed as Ctrl + 5 for Enable Symmetry, and my favorite Ctrl + 6 for Symmetry Options.


Additions Menu

These are so handy when you get to the end of pattern drafting your project and you can then quickly add your Bands for your knitting projects and your Facings, Extensions, Hems and Seam Allowances for your sewing projects. Goes so much faster, especially if you are like me and you use different seam allowances on different parts of the garment. With one hand on the mouse I select my lines and the other hand on the keyboard I hit Ctrl + K on the right side of my keyboard with my thumb and pinky - perfect hand span. There is one shortcut on this menu not listed on the menu side bar, you can press e/E for Edit Custom Additions.


Extras Menu

There are two listed shortcuts in the menu. While I'm here I would like to explain a few things. The grayed out menu items that have a colon : are Sub headings to the Extras menu. Collars:, Pockets:, Edging:, and Shapes: will never be ungrayed. In order to use those functions you must select an item from the list below the sub headings. If the menu items are grayed out then it means that something needs to happen first, like for an edging on a hem you need to first select the hem and then the Bottom Hem option will no longer by grayed out.


Generate Menu

This menu has a bit of shortcuts that are not listed on the menus sidebar. You can hit g/G for Pixel-Per-Stitch Graphics, b/B for Band Pixel-Per-Stitch Graphics, 5 for Shaping Instructions, 6 for Garment Area, 7 for Pattern Layout, n/N for Project Summary, Ctrl + M for Sloper Measurement Chart and m/M for Information and Recommendations.


Display Menu

There are four known shortcuts in this menu that are not listed on the menu sidebar. They are p/P for Print Preview, d/D for Dimensions/Counts Options.., Ctrl + 7 for 1/8 Scale and o/O for Highlight Moved Points. There are times when I am working on a project and I have the measurements displayed in decimals and I will select a point and use the arrow keys to move it up or down to try to get an exact measurement and it will skip the number I want it at. You can solve that problem by zooming in and then using your arrow keys to move your point up or down. When you are zoomed in the arrow keys move the points a shorter distance, so you are able to get more accurate point movements.


Garment Pieces Display Window

These shortcuts are not listed in the window. To use the following you need to click inside the piece you want it to effect. i/I for independent, a/A for Adjacent and j/J for Joined. This menu also has the following shortcuts that you can use: f/F for Show front of piece, k/K for show back of piece, l/L for show left of piece, r/R for show right of piece, c/C to Show corresponding on body or sleeve and h/H for hide.


Other Shortcuts

There are a few other listed Shortcuts, as I mentioned before you can use the 4 arrows to move your points, I use these a lot especially on a laptop without a mouse. Then there is the one I use most s/S it toggles Symmetry on and off. 0 is for Detailed Dimensions/Counts, and you can use your spacebar to move your screen around. You press the spacebar and Click + Hold + Drag your mouse to move your image on the screen.

****Note: Mac users would use the Command key on the keyboard instead of the Control key for windows.

Also there is a PDF that you are able to print out in either Mac or Windows in the Help Sheets folder that is in your Garment Designer folder on your Hard Drive. Printing them out will help you have them handy for easy access. I hope this helps in speeding up your Design process while on the computer and gets you to your knitting or sewing faster.

~Sonia Barton

Monday, October 25, 2010

Workshop in Denver

A couple of weekends ago, we had a Garment Designer workshop in the Denver area. It was a great day. Computers were lined up around the table and adjacent areas, and lots of laughter and learning occurred.

Thanks to college room-mate Edie, for hosting the workshop.


Wednesday, June 30, 2010

Garment Designer Pant Tutorial

A couple months back we created a facebook fan page for Cochenille. You can join us here. .

I posted a question asking what people would like for specials - I have a hard time coming up with them each month, feel free to comment on the subject if you like!!!

I didn't get a 'specials' suggestion - but it was suggested if we could do a Tips/Techniques once a month instead of or in addition to. My next question then became 'What would you like to start with?' and the suggestion came 'Copying Ready-to-wear'.

The thought for the post quickly formulated in my mind, mainly because I answer the Cochenille phone's and know a lot of the common questions - which by the way I have started to write down to include in these monthly Tips/Techniques posts.

I will start with the answer to the most common question 'Do you have Tutorials?' Yes, yes we do. You find the Tutorials in the Tutorials plus folder that is in the Garment Designer program folder on your Hard drive.

For Windows people - you click on My computer then Open the Hard drive (C: drive for most computers) then open the Program files folder then open the Garment Designer folder and there you will find the Tutorials plus folder.

For Mac people - you open the Hard drive then open the Applications Folder then open the Garment Designer folder and there you will find the Tutorials Plus folder.

Garment Designer versions 2.1.3 and below have the Tutorials plus folder:


Garment Designer version 2.5 has no folder, just the Tutorials PDF:


Tutorial number 2 (Pant Tutorial) Method One is a Tutorial that Susan wrote taking you step by step in how to copy a pair of pants you already have. Once you work your way through this tutorial you will be able to copy anything you already own using Garment Designer to create your pattern pieces.


Also most of you also own the Garment Designer lesson book 1, in that one Susan copies a Top, also step by step with fully illustrated instructions.


So the facebook fan group challenge for the month will be to take a garment that we own and replicate it using Garment Designer and what you have learned from the Tutorial.

I'm working my way through a pair of sweat pants that I'm turning into long shorts for summer - I'll write up a blog post, and tell you all what I learned working through the Tutorial and show you my results.

Feel free to join us on Facebook - or the Yahoo Group to tell us how you are doing and show us pictures of your project, and ask any questions that you might have.