by Sonia Barton
Garment Designer is so user friendly that you can simply install it and get started. This is a great thing, the only problem is that most of the time the manual doesn't get read and the vastness of the programs abilities can be missed. One thing that will help you get the most of Garment Designer is to learn the short cuts.
I'm a one hand on the keyboard and one hand on the mouse person. It just makes a project go a lot faster.
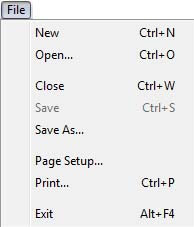
File Menu
Most programs have the same File commands and the same short cuts. The one I use often is Ctrl + S, Save. Save your work often, if you are doing something that you don't think you want to be permanent to that design then do a Save As and create another document. Just in case you have done something you don't want but you don't want to move all those points back or select the points and do an undo All Point Movement On Selected Points.
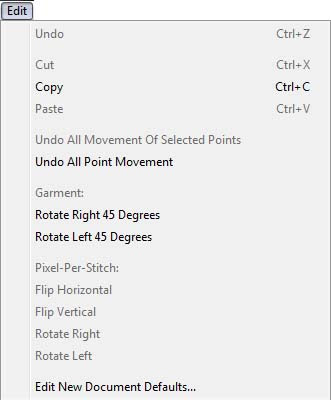
Edit Menu
The edit menu is also some what similar to other programs. The Undo, Cut, Copy and Paste. Garment Designer has a couple more shortcuts for this menu. When you are in the Pixel-Per-Stitch Window you can use the following shortcuts. x/X to Flip Horizontal, y/Y to Flip Vertical, z to Rotate Right and Z to Rotate Left.
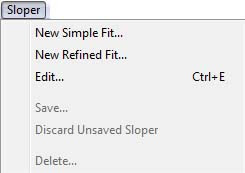
Sloper Menu
There is one listed shortcut in the sloper menu. I must admit I don't have this one memorized. I don't use it often. However, while I'm here I would like to mention how you delete a sloper. This question comes into Techsupport often. When you are viewing a Custom Sloper the Delete (the last command listed in this menu) with no longer be grayed out. You simply choose the sloper you want to delete from the Custom Sloper library and click on Sloper along the top menu bar and click on Delete...
Options Menu
There are more shortcuts to this menu than those that appear in the menu sidebar. Simply press 1 for Project, 2 for Garment, 3 for Knit. The Top/Dress Length is listed as Ctrl + L. Then you can press 4 for Yarn Data, and the Last two are listed as Ctrl + 5 for Enable Symmetry, and my favorite Ctrl + 6 for Symmetry Options.

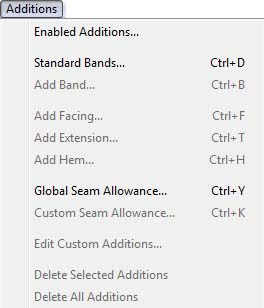
Additions Menu
These are so handy when you get to the end of pattern drafting your project and you can then quickly add your Bands for your knitting projects and your Facings, Extensions, Hems and Seam Allowances for your sewing projects. Goes so much faster, especially if you are like me and you use different seam allowances on different parts of the garment. With one hand on the mouse I select my lines and the other hand on the keyboard I hit Ctrl + K on the right side of my keyboard with my thumb and pinky - perfect hand span. There is one shortcut on this menu not listed on the menu side bar, you can press e/E for Edit Custom Additions.
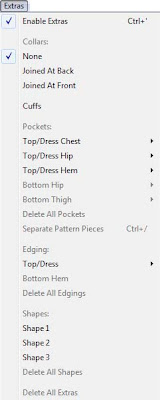
Extras Menu
There are two listed shortcuts in the menu. While I'm here I would like to explain a few things. The grayed out menu items that have a colon : are Sub headings to the Extras menu. Collars:, Pockets:, Edging:, and Shapes: will never be ungrayed. In order to use those functions you must select an item from the list below the sub headings. If the menu items are grayed out then it means that something needs to happen first, like for an edging on a hem you need to first select the hem and then the Bottom Hem option will no longer by grayed out.
Generate Menu
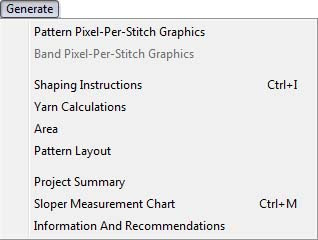
This menu has a bit of shortcuts that are not listed on the menus sidebar. You can hit g/G for Pixel-Per-Stitch Graphics, b/B for Band Pixel-Per-Stitch Graphics, 5 for Shaping Instructions, 6 for Garment Area, 7 for Pattern Layout, n/N for Project Summary, Ctrl + M for Sloper Measurement Chart and m/M for Information and Recommendations.
Display Menu
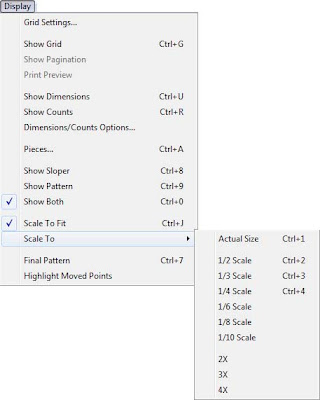
There are four known shortcuts in this menu that are not listed on the menu sidebar. They are p/P for Print Preview, d/D for Dimensions/Counts Options.., Ctrl + 7 for 1/8 Scale and o/O for Highlight Moved Points. There are times when I am working on a project and I have the measurements displayed in decimals and I will select a point and use the arrow keys to move it up or down to try to get an exact measurement and it will skip the number I want it at. You can solve that problem by zooming in and then using your arrow keys to move your point up or down. When you are zoomed in the arrow keys move the points a shorter distance, so you are able to get more accurate point movements.
Garment Pieces Display Window
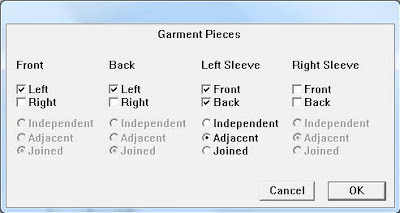
These shortcuts are not listed in the window. To use the following you need to click inside the piece you want it to effect. i/I for independent, a/A for Adjacent and j/J for Joined. This menu also has the following shortcuts that you can use: f/F for Show front of piece, k/K for show back of piece, l/L for show left of piece, r/R for show right of piece, c/C to Show corresponding on body or sleeve and h/H for hide.
Other Shortcuts
There are a few other listed Shortcuts, as I mentioned before you can use the 4 arrows to move your points, I use these a lot especially on a laptop without a mouse. Then there is the one I use most s/S it toggles Symmetry on and off. 0 is for Detailed Dimensions/Counts, and you can use your spacebar to move your screen around. You press the spacebar and Click + Hold + Drag your mouse to move your image on the screen.
****Note: Mac users would use the Command key on the keyboard instead of the Control key for windows.
Also there is a PDF that you are able to print out in either Mac or Windows in the Help Sheets folder that is in your Garment Designer folder on your Hard Drive. Printing them out will help you have them handy for easy access. I hope this helps in speeding up your Design process while on the computer and gets you to your knitting or sewing faster.
~Sonia Barton
No comments:
Post a Comment